I haven’t seen any tutorial for MagicaVoxel and basically had to figure it out on my own. Which I don’t mind it helps to stimulate the mind. Seeing that many people have questions about using this program, I figured why not make one. It’s really not a hard program to work with, you just have to think about it like if your sculpting a piece of clay, except that you’re sculpting out square after square. If there are any other tips and tricks that you think will help then comment and I’ll update this post.
Interface:
The interface is easy to work with. On the bottom towards the middle there’s a button with an “i” circled, click it on it and it tells you what each button does when you highlight over it.

Tutorial:
For this tutorial I’m going to show you how to do a simple Cornerstone decoration. Since Cornerstone decorations needs to face a certain direction, which in this case is the z-axis, this will help you with the orientation aspect.

**Quick Note: visit http://trove.wikia.com/wiki/Art_and_Creation_Guides for the Art and Creation Guide. It also shows you how to create Material Maps.
Orientation:
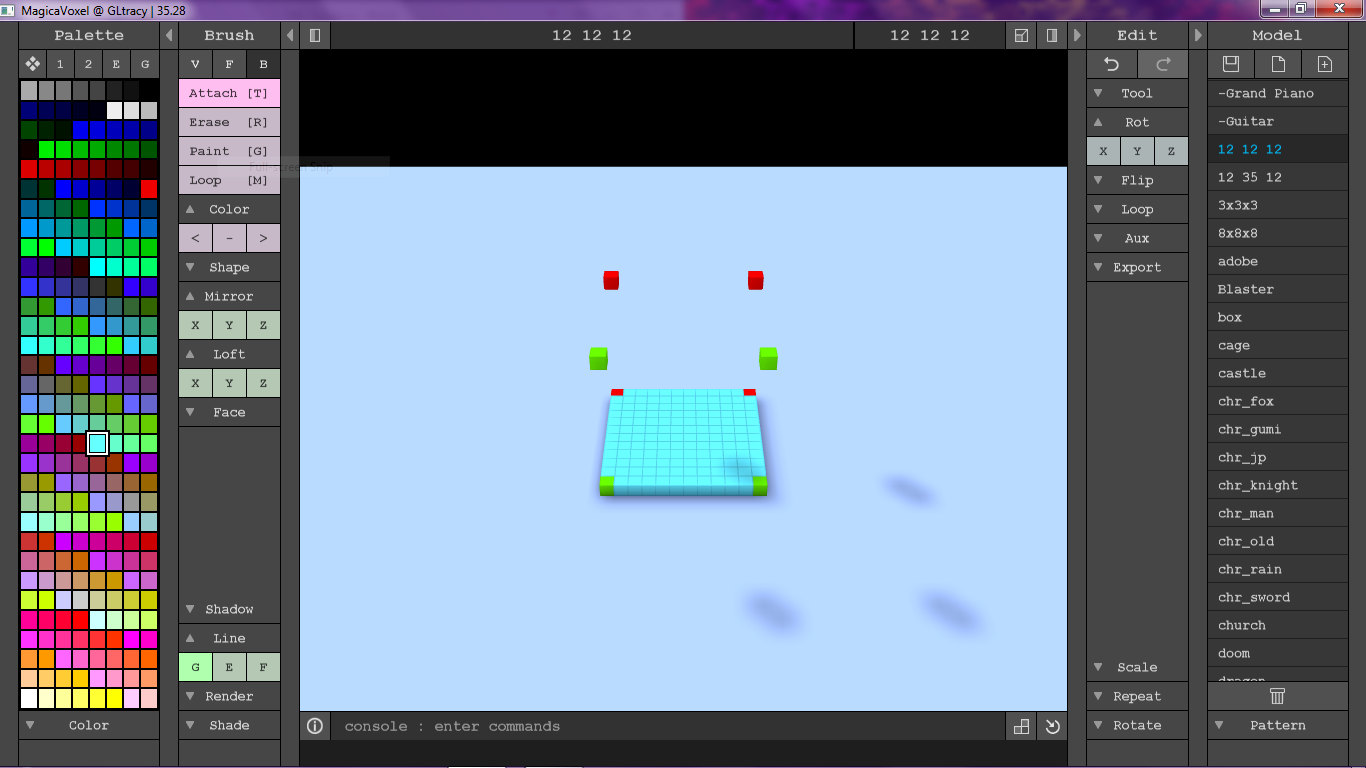
To start of is Orientation. Orientation can be the most confusing in Magica since it doesn’t specify exactly what direction is facing. Start off by creating a 12x12x12 model for the Cornerstone decoration. When you create it, it shows you the whole side of one face. This is where the orientation takes place.

For demonstration purpose, I highlighted each side a different color. The “front” side is the red, this side, when preview in-game, is facing away from the z-axis. To solve this problem all you need to do is rotate to the z- axis. You can do this before or after you do your creation (I prefer to do this after). To do this before, all you need to do is work on the other side of the plane, by rotating it. You should be facing the green side now. Or you can create your model, then rotate to the z-axis by going over to the “Edit” column and open the tab that says “Rotate” and press the “Y” button twice. But before or after your creation is made you’ll have to flip the x-axis to get it the right way in the game. I’ll explain this later. This will solve the orientation problem.

Creating is the fun part. The thing about Magica is that it won’t let you create anything out of the volume size. This is good to prevent making your model getting bigger than the size limit, while others don’t like this idea I actually prefer it. Also the only down-size of Magica is that there is no grid on the ground or sides, but you can create a grid on the surface of the model by opening the tab “Line” listed under the “Brush” column and then clicking on the “G” button.

When creating your model the only issue is when you remove the block to start from scratch, it’s hard to see where the sides are at. To accommodate for that, what I do is remove everything except I leave the corners up. Since the corners are rarely used, this helps in showing where your limit is. For this, I made the front corners be green (the side that’s facing the Z-axis) and the back corners red.

Another thing that would make life a bit easier is to add a layer of voxels on the ground so you can see where the grid is at. The same can be done on one side. (Just remember that your one voxel higher from the ground, but if you forget there is a quick fix).
To begin, I will be doing a simple table. To start off, create a base and legs. For this I’m just doing a simple one leg table.

Then build the top of the table. While I was building, I went ahead and made the base a bit bigger.

Then go on ahead and add any more details you wish to add. Now that the table is finished, you can see I have the floor to get rid of. As I said earlier there’s an easy fix.

Head over to the “Brush” column and click on the Loop button, or the “M” keyboard shortcut key. Click anywhere on the model and slide it down until the “floor” is at the top.

Here you can get rid of the entire top plane or, in this case, adding it to the design.

Now, you can go ahead and start to color the table as you wish. Here I colored it according to the color scheme earlier for orientation purpose.

After you’ve finished make sure you flip the x-axis orientation to insure that they are facing the right orientation when previewed in-game. This is why I normally do the orientation part at the end.

This next step is optional if you want to create Material Maps. If not you can skip over to the Blueprint section.
Material Maps:
This is one I had trouble with when I first started creating. In http://trove.wikia.com/wiki/Material_Map_Guide it tells you the coding in creating a Material Map. To start, you need to have saved your model by giving it name, then making a new copy and giving it a new name.

The first one I’ll be working with is the Type Map. Here you can make the block glow, a glass, or both. For the colors I made the blocks glow, while the rest is default colors. Make sure you name this the same name as before but with a “_t” at the name.

Next is the Alpha Map. Here you can set the transparency. For this I’ll leave mine all solid. Save this copy with the “_a” at the end.

Lastly is the Specular Map. Here you can set the blocks to be metal, water, or iridescent. The colors I set to be iridescent, while the rest is default. Save this copy with the “_s”.

Now that the character maps are finished we can go ahead and start the Blueprints.
Blueprints:
Blueprints are very easy to do. Firstly you’ll need to save the files as “.qb” files. To do this you’ll need to head over to the “Edit” column and open the tab export and you’ll see the “qb” button. Make sure you have the file open then click on the “qb” button.

After you’ve finished you should have four files. To find your files, head over to where you’ve downloaded MagicaVoxel and open the folder that says “export”.

You’ll drag and drop the original file to the “devtool_convert_to_blueprint” file. Which can normally be found in this file location C:\Program Files\Glyph\Games\Trove\Alpha. If not then you’ll have to search the original location Trove is installed.

Now you have a blueprint.

Previewing:
To preview the item you’ll need to download the Trove client to access the MetaForge. Even if you don’t have alpha access anyone can access MetaForge by going to http://www.reddit.com/r/TroveCreations/comments/25e7t2/important_only_accepting_blueprint_files_now/ and downloading the Trove Client. To get there, there is no button to press to head to the MetaForge, just click on F6 and you’ll be transported to the MetaForge (don’t try logging in it won’t do anything). Also on that website it tells you the commands in previewing items. For the table you’ll type “/decopreview [nameofblueprint]” (without the brackets or quotation). And there you go you got the preview of your Cornerstone Decoration. See how the green is facing on the right side (Z-axis) and the yellow portion to the right. When done before hand on Magica, you can get the right orientation on Trove the first time.

Also notice the glowing blocks when it’s at night when the Material Maps were added.

Thanks for going through this tutorial with me. If you have any questions or suggestions comment below.

Heya, thanks a lot for this!
Just wanted to tell you that Ctrl+G turns on a nice grid.
See all the hotkeys here: https://voxel.codeplex.com/wikipage?title=HotKey
Thank you for adding that! I completely forgot about the hotkeys.
Haha, understandable! For some reason I always look for hotkeys before I check out tutorials, I don’t know. Ctrl+F is really handy too, I like seeing the boundary space as well. And I agree with you, I like that MagicaVoxel doesn’t let you place voxels outside the boundary.
Could you please do a melee weapon tutorial, I am a bit confused on the orientation and such. Would be much apprecaited
Someone on the Trove Creations Reddit created a really nice Quick Setup Layouts. Here’s the link: http://i.imgur.com/8DSXaDR.png
https://www.youtube.com/watch?v=IGhwYwDGIyU (hope it helps 😉 )